EDITING WORKFLOW SERIES: Ep. 04 - The David Fincher Editing Technique (The Pancake Timeline)
- Jul 16, 2020
- 12 min read
Updated: Aug 18, 2022
Welcome back to our Editing Workflow Series!
In the last episode, we covered how we set up our Premiere projects in a way that keeps things organized and mimics our hard drive folder structure from Episode 1. Now we're moving onto the next step.

In this installment, we'll be showing you how to edit your Premiere Pro project using the Pancake Timeline technique that David Fincher's editing team uses for his films.
We picked up this technique from Vashi Nedomansky of Vashi Visuals in one of his articles from 2013 about "How to Edit a Music Video in Adobe," which he further goes into in his blog post called "The Pancake Timeline" which has examples and also his Premiere Pro template. Ours is a little different, but if you like his, download his.

In the article, he mentions how he discovered that Oscar-winning editors Kirk Baxter and Angus Wall of "The Social Network" were utilizing the stacked timelines in their post-production workflow, creating a super-efficient editing process.
Vashi has now had the chance to work under Kirk Baxter on projects like "Gone Girl" and "House of Cards." He has also worked as an editorial consultant for films like "Deadpool." You should really check out more of his tips and tricks on his website at vashivisuals.com.

The Pancake Timeline is basically just a way of stacking your timelines on top of each other. The top timeline being your selects and the bottom timeline usually being your master edit.

But before we get into the Pancake Timeline technique, let's talk about selects. As editors, it's our job to look through all of the footage given to us for any project, but it can be hard to keep track of what's usable and what's not when it gets buried in the editing process.
Selects are basically any usable material from the raw footage that could be used in the edit, and I mean any usable material. There could be something that you'll really want later that happens even before the slate clap and you just want to make sure that you're grabbing every little piece that's usable.

Keeping track of these selects and keeping them organized will make the editing process so much easier in the long run. You don't want to have to keep going back through your footage and wasting time. And that's what this series is all about. All this organization at the front end allows you to maximize the time that you can actually spend editing your projects.

In our last episode, we mentioned how each scene bin in our project window contains what we call a "selects" timeline. This is basically just a timeline that has all of our selects for each scene laid out in an organized fashion.

We like to keep our selects separated by scene just to stay more organized and just in case you do need to go back into the dailies and look for something that's missing. Our goal is to get out of the project pane. It's just not an efficient way to look at images because it's a list, it's text and it's small.
This is not an efficient way to be going through your footage. Double-clicking, finding the ins and outs, going back through and like oh, I think I liked this moment and this, it's just not efficient and it's not easy to see things visually.
Our goal is to as quickly as possible and as systematically as possible get out of the project pane so that we barely need to visit it. Our way of doing that is through selects. And selects is basically all the usable information from a clip.
So if you open the clip, we're waiting for the light to come on, basically the moment it's usable. I think the big thing when you're pulling that first round of selects, try really hard to not make creative judgments because you never know what you're going to need in the edit. Just get everything that's usable from the clip, it's that simple.
You'll see like this one has multiple resets and multiple takes in it. And you could in and out each one or you could just take a whole block.

Our goal is to create an assembly line-like process that funnels the massive amount of footage you have chiseling away until we have only the best material. And then we make our creative decision.
This way, we can dive right into editing and almost mindlessly do a lot of the tasks until that moment where we have all the selects next to each other.

When you can hear every line reading or every single time of Patrick walking forward and grabbing this iPad. It's really easy to see which one's the best one because you're isolating individual similar moments and similar takes so that you can make a judgment call looking at very specific sections and buckets of the film.

It's a way of auditioning different takes next to each other. With all of their competition, it just makes it really easy to directly compare a take versus its similar takes and make the most educated decision on what is the quote-unquote "best clip for this scene."
I know the way that David Fincher's team uses this is: Fincher wants to hear every line reading, every performance next to each other. So they'll put somebody saying a line in every single different take and put them all next to each other. And he'll tell the editor which line readings he liked the best. And that's his way of being confident that he chose the best take for every individual choice that he could make.
It gives us a sense of comfort knowing that there's nothing else outside of this timeline that could be used for this scene. Because editing can be really intimate. There is editor's block the same way there is writer's block. It's just like any other creative activity. The hardest thing is just to get started and to actually do it.

This way, you are putting off that final creative decision of what goes into your final edit until a little bit further down the line when you can make the most educated decision possible.

Make sure that every time you want to start a new cut that you duplicate your sequence and work off of the newly duplicated sequence. This ensures that you'll have backups of older cuts and sequences in case there's a situation where you need to revert back to a previous cut.
This is extremely helpful if you end up cutting yourself into a corner as you can always go back to the previous cut instead of hitting Undo 100 times.

We also like to separate out each setup on the timeline for each scene to stay more organized. So here we have the first scene for our most recent brand story for Snap! Orlando.
Each setup separated on the timeline with tiers, you can see we have different clips on different video tracks and basically the first track is the stuff that's okay. Like we said earlier, we put all the usable clips.
So Tier 1 is really the usable clips. Tier 2 is good and tier three is like this is the best take, this should be in the cut. And if anything's going to Tier 4 or Tier 5, it's like this is God's gift of footage and definitely should go in the film.

So it just allows you really quickly jump to the takes you thought on the first impression were the strongest. And each section is labeled and color-coded. These labels are actually chapter markers that we use to identify the different setups.

You can create chapter markers in two different ways. The easiest way is just to make sure a clip isn't selected. And then hit MM. So hitting it once makes the marker and hitting it a second time opens it up.


And the other way to make a marker would be just to right-click and say Add Chapter Marker. Just write out what it is and then you can color-code it.
You have a limited amount of marker colors, unfortunately, but just choose the color that you want and we like to alternate the colors just to give it some visual separation.


You can drag it out by holding Alt and this just changes the time and it snaps nicely to the size of the clips. So now I want this clip to match, so I'm going to choose Rose, and very quickly you can see how these colors end up being reflected in the timelines in the individual scenes and also in the overall timeline and it ends up making this really beautiful rainbow of colors.


The beauty of markers is that they also ripple so if you go to Markers and just make sure Ripple Sequence Markers is selected. So if I were to drag in a new clip from the source monitor and I'm holding Control, so a ripple insert you'll see that it pushes both the marker and the whole section, which is great.

You can see, this allows us to have all these different buckets. If you look at a more complicated timeline, you can see the value of this organization and these labels.
So that very quickly I know what this section is without even putting my play head over it. It's the magazine of Sky Delta. So it just allows you to quickly go through and find things.
These are all our newspapers, they're all the white color and you can see which ones they are without having to click through.

So now that we have our selects timelines all organized and labeled, let's elaborate on the Pancake Timeline technique.
In Premiere Pro, you are able to create completely custom workspaces where you can have any configuration of any window in any kind of layout you want which we talked about in our last episode about Premiere workspaces.
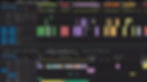
Premiere Pro allows you to stack sequence timelines on top of each other, like a pancake stack, as shown here. With this flexibility, we are able to have our selects timeline placed over top of the individual scene timeline that we can scroll through and look at, without having to go back and forth between tabbed sequences like we would up here.
So as you can see here, I have selects up top and I have the cut of the individual scene here and then the final film is all the way down here.

Say I don't need this timeline for the final film, I can just tier it down and now I have plenty more space to work with here. And the biggest benefit of this is you can drag clips from one timeline to the other without deleting the instance in the selects.

So for example, if I like this take, I can just drag it down into the timeline below it and nothing changes up here. It's just another instance of the clip. So I can do this with as many clips as I want and I can just drag them down straight into my edit which is a beautiful thing. If you think of it as a funnel, this is where we have all of our usable stuff.

You can see this scene had a ton of content where we were playing with newspapers and magazines and all sorts of things. So we just needed to have all of it organized so that we could very quickly grab what we needed but we didn't want to muddy up the main timeline which ended up being like a 12-minute timeline with all of the little ripple edits from this sequence.
We ended up doing individual cuts of just this one scene and editing it below the main selects timeline and then we are ready, we could even drag this down into the main timeline. And as you can see, this timeline also is not committing to decisions yet.

This is just an open playground for you to start seeing what a scene could be like. So as you can see, we have like all of this stuff over here which were things that we liked and maybe could integrate but we didn't want to quite delete them yet because we wanted to remind ourselves of what we liked. Almost the same way that we are trying to never have to go back to the project pane.


These individual scene edits allow us to pull all of our favorite footage from the selects so that we don't have to go back to this humongous selects timeline. Hence why we're holding on to some of it just in case it comes up with a chance to be in the edit.
And the selects Timeline is very flexible to fit your project. So as you can see here, we kind of went a traditional setup approach as if we slated each setup and just separated each setup in the selects timeline. You can also use it for interviews' organization.

For example, this is our interview for this brand story and as you can see, the selects quote unquote "timeline" and our selects timeline which includes all the usable sound bites from the interview is two hours, like almost 2.5 hours.
This is pretty useless to us. You don't want to keep having to go through this 2.5 hours. All I did was cut out all the pauses and the restarts and my questions so that it's only them answering the questions.

So for an interview, there's a benefit to making a second selects timeline that's more organized than a selects timeline would be naturally. So I made sections with markers in kind of a hero's journey narrative order and then as I was listening to the interview, I would pull down the different sound bites and put them in their appropriate buckets.
So this was an example of me making the markers before I listened to the interview so that I can maximize my time.
So as I was going through the selects timeline up here, I was pulling down answers and putting them into their appropriate bucket so that I could later listen to all the sound bites about a specific topic so that in my next pass, I could go through the organized selects and listen to sound bites next to each other that were all about the same subject rather than interview sound bites that could go all over the place.

Another benefit of making your selects in the same order as you intend to structure the film is that it's a very direct relationship coming down. So as you can see, these sections are like doubts and fears, snap as the answer, the intentionality behind it, their ideal artist, stretching beyond a space, case study one.
This way, if you're in order with how you want to cut, you can start all the way on the left side and just choose the best sound bites from this section and that's your opening.
And then the next section, choose the best sound bites from there, maybe cutting these individual or little chunks as you build your way up to having a full edit and a full audio cut using the interview.


And this way, if you're like, oh I wish I had another sound bite about this theme or this subject, you can always come back to this organized selects and quickly find those sound bites and easily drag them into your master timeline.

And so for another example would be a more events style documentary shooting where the camera filmed a lot of different things throughout an event. There's no slate or anything like that so can you come up with the sections that you would want to be able to find quickly when you're creating the edit for this specific scene?

For example, this was an event, right, so I have all the establishing shots. All the setting up, then I have our two main characters setting up, so it's like this is setting up in general but we're mainly focused on our main characters. So I want all of those clips separate away from the general setup. This is just Patrick by himself, this is Holly by herself setting up. This is a section of all the clips of Douglas Kirkland which is the main artist of this event.

Rather than mixing this stuff up in time order when we actually shot it, we want to have the sections so that we can very quickly just be like oh I need another shot of Douglas Kirkland. I can jump to this section and just look at all of them and choose the best one.

It definitely helps to know kind of what you're thinking in your head for how you want to edit the final film because you can design your selects and even structure your selects to mirror how you want to cut that scene and you don't have to alternate colors like this, you could even do something say for the interview where you color-code by who's speaking.

For like Patrick and Holly, you could assign Patrick blue and Holly orange or something and color-code all the answers by who's speaking and that way you would have all of these selects and then also have another visual separation rather than them all being forest green, you would have these two different colors.
If you're like, oh I need another sound bite from Holly here, we've heard enough from Patrick, so I can go back and very quickly visually see which little rectangles are Holly in this specific section. So those are just some other ways you can use selects. To make sure that you're choosing the best take, you want to be confident in your decisions.

I think my biggest fear is that I'll leave something out that was actually like the best shot. So this way allows you to really make educated decisions 'cause you can watch every take next to each other with all the fat taken out. It's only the usable stuff.
You can be confident out of these five shots, these two were the best, and then you drag it into your timeline and that makes editing so much easier because in your final edit, you're only editing the best stuff. And that concludes our overview of the Pancake Timeline.

Next in our series, we will cover how we create backups and archives of our projects using Carbon Copy Cloner. This will be the last episode in our Editing Workflow Series so be sure to subscribe to make sure you don't miss it.
Now we want to hear from you! How do you pull selects for your projects? Have you ever tried this Pancake Timeline technique and how do you organize your timelines? Let us know in the comments.